Useful Tips for ROS Users
Earlier people had to write a large amount of code ranging from low-level driver functions to high-level control algorithms for their robots. I too experienced this pain when I started working on the underwater vehicle project in my undergraduate university. This approach sometimes made changing even one sensor on our system a daunting task. However, things changed when we started using Robot Operating System (ROS) as the framework for our robot’s software stack. The large open sourced community for ROS has made it possible to implement novel algorithms on the robot without worrying too much about the hardware-software integration.
Although the ROS tutorials introduces various core concepts of ROS, it takes a bit of hard work to develop a better comprehension of the entire robot software architecture. Even after going through tutorials, I struggled to write my first ROS node. (Could be I am a slow learner? :P ) Having said that, the post highlights a few interesting ROS concepts and packages that a beginner might find useful in his journey as a robotics developer.
DISCLAIMER: Some of the points have been taken from ROS Answers and ROS Documentation. The blog mainly aims to put all the relevant sources together for a beginner to learn about this amazing framework smoothly.
1. Different Naming Styles
Nodes, topics, services, and parameters are referred to as graph resources in ROS. Each of these is identified with a unique graph resource name within the ROS computation graph. The naming scheme is hierarchical in nature. In general, there are three different naming systems followed:
- Global Name:
- Begins with leading slash (
/) - Requires no additional resolving to decide the resource being referred to
- Comprises of a sequence of zero or more namespaces and a base name. The namespace helps in grouping related graph resources together while the base name describes the resource itself
Examples:
/turtle1/cmd_vel,/turtle1/posebelong to the namespaceturtle1with the base namescmd_velandposerespectively - Begins with leading slash (
- Relative Name:
- Does not have any special character at the start
- Relies on ROS client library to resolve the name into a global name
- Resolving done by attaching the name of default namespace to the front of relative name
- Provides flexibility over organization of system and helps in avoiding name clashes when groups of same nodes are to be launched
Examples:
cmd_vel,camera/rgb/img_raware relative names. To map to the global name, suppose name of default namespace is/alpha. Conseqently the global names would/alpha/cmd_veland/alpha/camera/rgb/img_rawrespectively. - Private Name:
- Begins with tilde (
~) character - Relies on ROS client library to resolve the name into a global name
- Resolving is done similar to that for relative name, however, the name of the node is used as namespace instead of default namespace
- Often used for setting parameters to a node since a node’s namespace is not required to be shared
Example: For a node with global name
/zonePublisher, if it has a private parameter~land_sitethen its global name would become/zonePublisher/land_site - Begins with tilde (
NOTE: To know more about graph resource names, refer to the book chapter here.
2. Nodes vs. Nodelets
In ROS each node runs as a single process. The nodes communicate with each other using the TCPROS protocol (which uses the standard TCP/IP Sockets). This usually suffices for most of the data transfer that needs to be done between nodes. However, when data is large (such as laser scans or point clouds), it is faster to send a pointer to the data location instead of sending the entire data in form of packets through the TCP protocol. In cases like these, nodelets prove to be useful.
Nodelets allow running multiple algorithms in a thread, with each algorithm running as a thread in the process. roscpp provides optimizations that allow pointers to be passed between publisher and subscriber calls within a node without the need of copying data from one memory location to another (also called zero copying). The ROS documentation here provides a nice overview on how to write nodelets.
3. Topics vs. Services vs. Actionlib
The table below concisely describes how topics, services, and actionlib differ. More information about this is available in the ROSWiki documentation on Communication Patterns.
| Topics | Services | Actionlib |
|---|---|---|
| Used for continuous data streams (like sensor data, robot state) | Used for remote procedure calls that terminate quickly, mainly query based actions (like performing inverse kinematics calculation) | Used for any discrete behavior that moves a robot or that runs for a long time and feedback is required during execution |
| Continuous data flow is allowed with many-to-many connections feasible | Simple blocking call for processing requests | More complex non-blocking background processing for real-world actions |
4. Running commands via a checklist
Yes, it is possible to do this through the screerun package in ROS. The node screenrun parse over the commands written in a YAML file and push them onto a virtual terminal as if you have typed them. However, only those commands that end with \015 (the octal literal for Enter) are executed.
This comes in handy when you have to deal with large project repositories. Although running nodes by using launch files is common (and recommended), the screenrun package provides more flexibility over the general terminals commands that one might need to execute.
A sample config file config.yaml is as follows:
programs:
  -
    name: 2d-mapping
    commands:
      - roscd alpha_master
      - roslaunch alpha_master sim_alpha_slam.launch\015
  -
    name: 2d-navigation
    commands:
      - roslaunch alpha_move_base move_base.launch\015
  -
    name: bag
    commands:
      - rosbag record --duration=30 /map /particlecloud /tf
To run the node, you could either use rosrun screenrun screenrun [b] or launch it through a launch file:
<launch>
  <node name="screenrun" pkg="screenrun" type="screenrun" args="b" output="screen">
    <rosparam file="$(find <package-name>)/screenrun/config.yaml" command="load"/>
  </node>
</launch>
NOTE: The argument b is optional. If b is passed, byobu is used instead of screen.
5. Single Threading in ROS Processes
Understanding ros::spin() and ros::spinOnce() is important when you start writing your nodes. Quoting Patrick’s
answer for significance of ros::spinOnce()
In the background, ROS monitors socket connections for any topics you’ve subscribed to. When a message arrives, ROS pushes the subscriber callback onto a queue. It does not call it immediately. ROS only processes the callbacks when you tell it to with
ros::spinOnce(). This is all part of roscpp’s ” toolbox, not framework” philosophy. roscpp does not mandate a particular threading model for your node, nor does it demand to wrap yourmain().ros::spin()is purely a convenience, a main loop for ROS that repeatedly callsros::spinOnce()until your node is shut down.
If we dig a bit deeper through documentation on callbacks and spinning, the answer by Patrick is verified through the code snippets given below:
ros::spin()implementation
#include <ros/callback_queue.h>
ros::NodeHandle n;

while (ros::ok()) {
  ros::getGlobalCallbackQueue()->callAvailable(ros::WallDuration(0.1));
}ros::spinOnce()implementation
#include <ros/callback_queue.h>

ros::getGlobalCallbackQueue()->callAvailable(ros::WallDuration(0));
In above procedures, the call to ros::getGlobalCallbackQueue() gets the global queue in which all callbacks are assigned to by default. The callAvailable() method pops everything present in the queue and invokes all of them. It has an optional timeout argument given above using ros::WallDuration(..). If there are no callbacks in the queue and the timeout is set to 0, then the method returns immediately.
Typically, ros::spinOnce() is used when the program has to perform certain actions other than responding to callbacks. These include when the rate at which a particular action is performed needs to be controlled. For instance, publishing data onto a topic at a particular frequency. Omitting either ros::spin() or ros::spinOnce() would make the code behave undesirably. Deleting ros::spin() from a subscriber node would close the execution after a while, while removal of ros::spinOnce() would make it appear as if no messages are being received. Thus, utmost care must be taken while writing your ROS node.
6. Miss the GUIs?
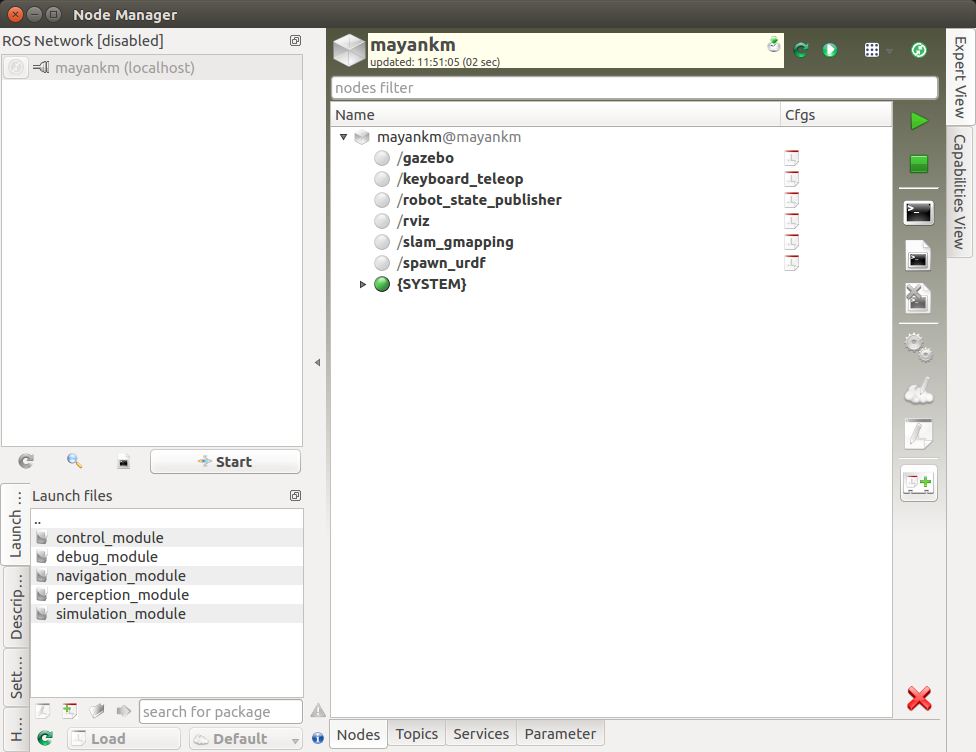
Running ROS commands through the terminal isn’t really a bad practice. However, if you are like me, then you’d prefer GUIs more any particular day. ROS actually provides its own Qt-based GUI tool called rqt. In the rqt_gui, various plugins can be imported to do a variety of things. The ones available include publishing to a topic, visualizing on rviz, robot monitor and many other given here. In fact, if required you could design your own rqt plugin by following the tutorial here.
Well, the one which I grew a fancy for is particularly the node_manager_fkie. The interface makes it easier to launch bodes and monitor their health and view the topics, services, and parameters being published. Thus, saving the time to write terminal commands every time.

7. Implement. Implement. Implement.
This can’t be emphasized enough but claiming to know ROS by just having done the tutorials is equivalent to saying that one has learned how to code after just seeing the syntax of a programming language. Learning can be faster if you have an application in mind. If you don’t already, consider the following challenges:

- For Hardware Lovers: Using your favorite developer platform (say, Arduino), and write an Arduino node that shall subscribe to a topic and use the information published there to perform some event such as actuation of a motor using PWM signals from the controller. (Hint: Take a look at the rosserial_arduino package)
- For Computer Vision Lovers: Using the OpenCV library, write a node which publishes the image frames from a camera onto a topic and then visualize the data being published through the image_view package. (Hint: Take a look at the cv_bridge package)
NOTE: The above list is open to additions. If you would like to add more to it, feel free to comment below on this post.
Conclusion
Sinking in all the above information might take a while but once you have understood them, I hope using ROS for your robot becomes easier.
To be honest, this framework has much more to it than just the above-mentioned points. There are a few more interesting concepts like message filters, setting up diagnostics for your robot which I would strongly recommend looking into when you get the time.
If you enjoyed this post, it would be great if you would share it with your robotics-loving friends. Thank you!